It's cruch time for Christmas..I only have 5 days to get ready, set up the tree, decorate the house, bake some cookies and get out our traditional things for the family..but came across this great tut about making fabulous bows from those pesky plastic bags.. click on this link to get there. Sorry I haven't make any new tuts, am workin on them this week..I hope. Been wonderfully busy getting orders done, making new sets for the two brick&mortor shops and just generally been heckabusy.
Hope ya'll have a jolly good Christmas Celebration and look forward to hearin from ya in the new Year.... rozzi
Sunday, December 20, 2009
Saturday, October 31, 2009
DIY 15 minute SASSY SKIRT girls sizes 6/12 months to 2T
 Since creating this cute little skirt, I've done it several different ways..as you can see. It only takes 15 minutes to sew after you have all the peices cut. Come see the TUTORIAL! It on page 38. It is in the newest edition of MHC...the Ezine for Etsy Kids. The gifts my team mates have made are 2dye4 cute.. Really...you need to get a look.
I know that once you are there, you'll find lots of amazing articles that are a real help. Shannon and the Editors did a fab job. We are talking seriously talented women.
So if you want an easy pattern that anyone can make, even a novice sewer, this is the one. I am really proud of it. It's all for you! The number and kinds of skirts you can make are only limited by your imagination. hugs rozzi
Sunday, October 11, 2009
BIRTHDAY Shirt-Rozzis Sweet Peas--sizes 6 mon-6yrs
 These adorable Bowling shirts are DIY from YCMT site. Just love them.
I started making them for my grandson and can't seem to find the
strength to stop. These were a custom order for one of my fabulous
customers on ETSY. This CUPCAKE CUTEE is just right for a Unique...
Adventurous.... Sweet lit'l Girl.
What better way to celebrate her birthday than a bowling party with all her girlpals.
So what would a sweet pea that loves pink like...you guessed it a Chocolate Cupcake.
 So head over to You CAN Make This and whip up a shirt or two.
Wish they made this deliciousness for moms and grandmoms too!
I will be makin this shirt again and I will do a S&S Tut cuz the original Tut is so dang good.
happy stitchin rozzi
Sunday, September 13, 2009
Finding out WHAT kinda FABRIC this IS!

Mystery Fabric is Kinda like the mystery meat My mom cooked when we were little kids...that's fabric someone gives u that' s been hangin in their sewin room for ages.
Mystery Fabric...
what is it..
how do you wash it...
can you iron it.
Will it make something you had in mind cute or gosh darn awful???
Well over at Burda I found a chart that will help us all figure out if we can use or loose this fabulous FREE gift from our Great Aunt Tilda.
BURN CHART just click on this and it will send you over there and you can test your itty bitty peice of fabric and know exactly what it is...how cool is this.
hugs rozzi
Sunday, August 30, 2009
Featured on TIP JUNKIE
Yeepee! our article on Beginning Sewing 101 was featured on tip Junkie..a favorite site of ours. Do go visit there are thousands of ideas...things you can do just like other SAHMs. Sharing is what its all about. Just click on the link below Hugs rozzi
TIP JUNKIE
TIP JUNKIE
Tuesday, August 11, 2009
Fave Crafts making more eco friendly choices and Refashion is Fashionable

Found a great site for crafting...make halloween luminaries from old soda pop bottles. Naw..they don't look stupid. So head over there for more ideas. Looks very interesting. Something for everyone.
Sunday, August 9, 2009
Eco FRiendly Sewing: making toddler shorts from your Jean Cutoffs


Sometimes the darnest things makes kids happy. For my dgs it was getting a pair of jean shorts from his sisters old jeans. Why? I haven't a clue..but he brought me my camera and said.".Granma Rowzzie take my picture..of my new pirate pants." I am now doing a tut for making these shorts...free no less.

I started doing this when my boys were little, ok that would be a loooong time ago but it still works today. Then it was from dad's worn out long leg jeans. Now it's new jeans fashioned from Grampa's old jeans. Amazing how important sharing old jeans can be.
Making pants:
Here's my homemade pattern for size 18/24 months. It should work if you print each page then tape the two together (Click on pic and Save as to your computer then print on full page). The two taped together should be 14 3/4 inches long. Use the crotch on both pages to line it up and please note the top of the pants has the elastic casing.
You now have a pattern for one leg. There is no front and back. Don't worry...Toddlers have diapers so that makes it easier to sew for them..plus they haven't had years to pack on the pounds around the derriere if you know what I mean.


Please note...this is cut on the fold! So when you are placing the pattern over the jeans make sure that the fold of the pattern is on the side seam. Lining up your seams from the old pair of jeans makes this easier.


Now carefully cut out the pattern remembering the longest side you do not cut. Now when you lay out the fabric it should look like this:

Now the fun part. Sewing .
1. Put the inside of the legs together wrong sides out facing you. Seam with 2.5 stitch length and denim sewing needle. I like to use two threads in the needle and one thread in the bobbin for greater strength especially with boys.

Hint: this is were I press my seam allowance for the waist. I have yours marked on the pattern and you can use it as a guide. Or you can create your own by marking 1 inch and 1/4 inch lines on cardstock making a line across and using this as your ironing guide. This does make it EASIER to sew your elastic casing later.
2. Turn inside out and press your seam. Pressing keeps your sewing looking professional.
3. Now you have two separate legs. To join them together turn one leg inside out. Put that one on the outside of the other and pull it inside of the other one. Now it looks like you only have one peice. It's kinda like a pants sandwich so now line up the two crotches and the seams. I usually pin this to keep my seams straight. Now seam the crotch which will be a curve seam two times. Finish your seam with either a zizzag stitch or if you have a serger, serge the seam .
 4. Pin the Waist casing down. Starting at a crotch seam back stitch a few times to anchor your stitches then seam around the top. Remember to turn under the 1/4 so that your seam is clean. ( You can do it with raw edges for that deconstructed look.) Do not go all the way around the waist...you need to leave about 1 to 1 1/2 inches open to insert your elastic. Again finish the seam with a 3-4 back stitches to keep your seam from unraveling when you pull the elastic thru the casing.
 The length of elastic needed for the waist is determined by measuring your sweet pea's waist and subtracting 2 inches. This pattern you need 3/4 inch wide stretchy elastic. ( I usually go to Hancocks and get mine off the big roll. It usually runs 30-40 cents a yard and works great for me.)
5. Pulling the elastic thru the casing.
To keep from twisting the elastic as I pull it thru I make two little marks with a pencil at the ends of the elastic on the same side so I can match them up when I go to sew them together. I also attach one small safty pin on one end of the elastic to pull thur and One BIG safety pin on the other end to keep from pulling the elastic thur by accident. Now insert your elastic and you will end up with two safety pins in the opening you left. Make sure your marks are on the same side either up or down.
6. Sewing elastic together.
For beginners I think the best method is the scrap of fabric butt joint.
For beginners I think the best method is the scrap of fabric butt joint.

Place a small scrap of cotton fabric under one end of the elastic. Take the safety pin out first.
Carefully stitch up and down the width of the elastic 4 or 5 times.
Butt the other end to the sewn end over the scrap of fabric. Take out the safety pin and do the same thing.
Carefully stitch up and down the width of the elastic 4 or 5 times.
Butt the other end to the sewn end over the scrap of fabric. Take out the safety pin and do the same thing.
Carefully trim away the extra fabric being careful to NOT cut your elastic.
Pull your pants at the top and tuck the sewn circle of elastic into the casing. Now the elastic should disappear.
7. Stitch your opening closed. Try to match up your seams and remember to back stitch at the
7. Stitch your opening closed. Try to match up your seams and remember to back stitch at the
beginning and end of each stitch to anchor them.
8. You should have a hem already made if you lined up the pattern at the bottom of the old jeans as in my pic above.
9. New refashioned jeans for a Sweet boy or girl.
ps. I've shared my sewing secrets with you and you've probably never heard of these before. However, they are tired and true. I use them all the time. If my humble attempts to share have left you confused...please don't hesitate to leave a comment and I promise to get back to you asap. Sewing is fun and can be energy conscious too. hugs rozzi
Thursday, August 6, 2009
Drawstring Tutorial Made it to a new Ezine

I've been busy as a bee this summer, sewing, creating, cutting out new patterns I've created. Wow! some of this I've never even thought of doing. One of my favs...drawstring bags I recreated into a backpack that even beginners can make. Then to my surprise, Shannon of Etsy Kids and her team decided it was good enough to put in the new TEAM ETSY KIDS online MAGAZINE. Modern Handmade Child ..hip hip horray for us. My honey is as thrilled as I am. I'm on page 30.
Do take a moment to go to the ModernChild Magazine and look it over. There are some real fabulous articles and a lot of practical ones. My oh my...am I gushing again. You'll just have to go see for yourself...I was blown away by how technically wonderful it was...I haven't forgotten those you following this blog.
Coming Soon: Emily's Baby Blanket pattern and Tutorial
Megan's Easy Peasy Girls Size 2T Jumper
hugs rozzi
Tuesday, August 4, 2009
Wednesday, July 15, 2009
MAKING QUILTS the Olde FASHIONED WAY
 Pressing, ironing is VERY important for the finished look of your sewing project! IRON IT darn IT...should be your motto.
 As you can see we did not have a quilting frame...not a problem for this small quilt. We just used the floor. Still gets the job done.
 Quilting, even your kids can tie a quilt. This one is a baby crib quilt we made as a gift.
The lesson this week is easy Quilting.
Equipment needed: sewing machine with straight stitch.
good sharp sissors
thread
ruler
pencil
darning needles
crochet or knitting yarn
scraps of cotton fabric
single cotton bed sheet
Making a simple Baby's Crib Quilt size 45 inches wide by 60 inches long
Begin by cutting the fabric into 6 inch strips. I used my rotary cutter and my ruler. You could also rip the strips by cutting a small snip on the salvage after marking the fabric edges with your ruler and pencil making the marks every six inches. You should have 10 strips to give you 60 inches. Most fabric comes in 45 inch widths so that should be no problem. If your fabric is not 45 inches wide then sew strips together to make it 6 inches wide by 45 inches long, trimming as needed.
Look before you sew the strips together. Take a moment to look at the fabrics and combinations that are pleasing to the eye. Always make sure you have patterns and solids in an arrangement that is pleasing to you. Don't just throw any strip together. Be creative.
Now with wrong sides of strips sew them together. Use a tight stitch 2.5 is the usual. Seam allowance is usually 1/4 inch. Iron each seam as you sew. Pull gently on the seam and make sure the seam is secure. If you notice the seam coming apart. Now is the time to restitch. When all of the strips are sewn you will have a large retangle 45 inches wide by 60 inches long. Don't worry if your strips are not even or if you are not absolutely 45 by 60...don't cut anything right now.
Now you are going to sandwich the quilt top you just finished with a layer of batting in the middle and the backing together. Just remember the backing made from a sheet has to be larger by at least 5 inches than the quilt top. When you start tyeing the quilt together you will loose some inches from the backing. I don't know why...I just know this happens everytime I've quilted.
There are several ways you can secure the three layers, hand baste, pins and quilting frame. Since I don't have a frame and I don't like to handsew, we opted for the pins. I use the larger size yellow top quilting pins...great stuff. My gd and I were liberal with them and it worked great.
We started tieing the quilt at the end. You really should start in the middle and work your way out to the edges. But since we were sitting on the floor, it made more sense to start at the end. The strips help you keep track of where to place the knots. We used the width of our hand as a guide as to where to make the knots. Now when you tie a quilt you put a generous amount of yarn on your darning needle. You make your first knot tieing it over and under for a square knot so it doesn't come out in the wash. Now don't cut your yarn, just go to the next spot and tie your next knot..just remember to go over and under the yarn. When you are out of yarn, you can stop...clip the yarn between the knots and leave the tails..they will curl up after being in the wash and if they are too short your knot will come out.
For the crib size quilt it took us two days and about 4 hours each day. We made shopping trips and visited and went to the pool so it probably would have taken less time but where is the fun in that.
When the whole quilt is tied now you need to finish the edges. I took the quilt to my cutting table and using my tape measure and my rotary cutter, I squared all the sides. You can do the same thing with a ruler and pencil. Just cut carefully. For my binding...the peice of fabric which covers all the edges, I used a 4 inch strip of fabric that coordinated with the quilt top. I placed the strip right side to the quilt backing, pinned it together with about 2 inches over the edges. Seamed the quilt and binding together using the 2.5 stitch length and a 1/2 inch seam allowance. I did both the top and bottom first ( 45 inch wide side). Then I did the long sides next..with the extra fabric over each edge. When these were done, I trimed the extra fabric off the long sides only and ironed my seams. I also ironed a 1/2 inch crease...the right side folded toward the wrong side. Then I pulled the binding to the front or the quilt top with all the strips and pinned the creased edge down. I stitched the long sides first. Now you turn under the extra fabric on the top and bottom, pin the edges down and seam again.
Now you are finished.
Later I will try to draw some diagrams that are simple to understand. But if you are interested in making quilts, I think the smaller quilt is a great place to start. Now mind you there are some BEAUTIFUL quilts out there and I know there are tons of quilting books. But I can still remember trying to figure out all the techical jargin and not getting anywhere. My quilts would come apart and or the ends would come unraveled and my boys would have thread bear covers till some one said..." hey sweetie don't make it harder than it has to be. "
Good luck with your sewing.. hugs rozzi and her granddaughters.
Sunday, June 21, 2009
Getting READY to SEW...fabric and 3 Ways of finding the SWEET SPOT
LESSON #1 FINDING the Sweet Spot
 method # 1 Tear and Conquer


method #3 Slice and DICE
Ok, here goes everyone. The first and most important part of sewing anything...the fabric. Why is it so important to find the sweet spot? What is a sweet spot anyway?
Why does it matter if you find the grain or not? Will it matter in 10 years? Will anybody know about this missed sweet spot other than me?
Yes, I do understand your reasoning and I have asked myself the same questions. So to answer the First one...The Sweet SPOT is very IMPORTANT to U.
The grain of your fabric, the threads that fall crosswise and up and down needs to be centered. This is what I call the SWEET SPOT. U will be working with a textile that is formed from thousands of small strings..if you cut your garment at an angle, cutting thru the sweet spot at an angle, then your garment will be catewompis. No this is not life threatening, however please take note****** Your product is only as good as the cut.*********
 So how do you prevent this from happening by finding your sweet spot..glad u asked. There are several ways to accomplish this. I will go over three of these methods.
Method #1....TEAR and CONQUER!
That's right tear...you are going to make a small cut on the salvage, you know that hard part of the edge of your fabric. The part that you can't tear by just pulling really really hard, yea that's called the SALVAGE.
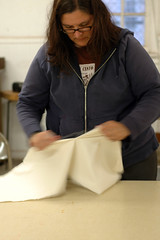 Image by Marshall Astor - Food Pornographer via Flickr
So now that you made a cut , oh about a 1/4 inch , you put your sissors down, and pull and the fabric tears straight across with your bear hands. You'll see some loose treads, that's the weave we talked about earlier. Now you have found the SWEET SPOT and you can fold your fabric with salvage edges together and the new torn edge at one end...TATA! U found it.
As hilarious as this sounds, this is a good way to find the sweet spot but if it is too Brutish and uncooth for your tastes...the next way is more refined and dignified.
Method #2 SNIPP IT
Now using your ruler, yep the one you used in grade school to draw pretty lines, and find the SWEET SPOT just like you would if you were cutting a 2 by 4 (lumber). Think T. One ruler resting on the other in the shape of a T. Upside down...The one ruler on the edge of your fabric with the salvage and the other crosswise on you fabric. Mark it with a pencil and snipp this line with your scissors. Takes a little more time, has less mental claifying benefits--getting that aggression out and all-- but does the trick.
If you possess a T square, I highly recommend using it. It does make you look Oh so much more professional in front of your family and friends.
Method #3 SLICE and DICE
 This is by far my favorite method of finding the sweet spot.
However you will need three peices of equipment or Sewing Gagets as I like to say...1. rotary cutter and 2. rotary cutter mat and 3. rotary cutter clear ruler.

Now for some of you this is very squeamish...using a rotary cutter and all the slicing and dicing of the fabric. However, with care you can accomplish this without harming the fabric, furniture, kitchen counters or YOURSELF. I have been using mine since it was first introduced...which was in the 80's I think. I still had all my hair and it was a nice shade of brown, so yea I'm pretty sure it was the 80's. Well back to the lesson at hand.. you will be placing the folded fabric with salvage edges together along the edge of the mat, keeping it straight. ( If this is difficult a little scotch tape will hold it down nicely and it doesn't matter if you slice thru it. )

Now your place your straight edge ruler made for the cutter along one of the marked lines closest to your edge and then with gentle, even pressure you roll the blade next to the ruler and across the fabric. TATA...you have a straight edge and you have your SWEET SPOT. Hint*******U need to read all instructions before using this sewing gaget. U need to use care and caution since it does have a rotary cutter that can roll. Be sure and CLOSE the Cutting BLADE after e
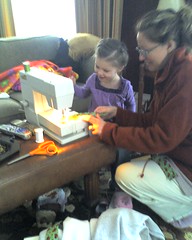 Image by billhd via Flickr
In conclusion, you have started on the road to sewing. I hope I made it fun and educational at the same time. I hope this helps . Look for Lesson #2 in a few days. Feel free to make comments...not rude ones I hope. I purchased all the items in this demo from local fabric stores nearby on sale. Make sure your rotary cutter is in excellent condition and that you can purchase extra blades at the store near you. Other blogs related...How I use my rotary cutter at momblognetwork.com

![Reblog this post [with Zemanta]](http://img.zemanta.com/reblog_e.png?x-id=50e1903d-1d0e-4c2e-b491-24556bd4503d)
Saturday, June 20, 2009
the Ology of Sweet Pea
hello again. my name is Rozzi and I am a sewing fanatic. My joy and the love of my life is creating thru sewing. I have way too much fabric in my house, I have way too many sewing gagets in my house, I have way too many sewing books in my house, I have way too many patterns in my house. How does this benefit you??? Well if I can share my 40+ years of sewing knowhow with you, If you would like to learn how to make something simple into something spectacular, if you are sick and tired of spending way too much on clothing for you and your family...then this blog is your spot and I have done what I set out to do...SHARE with YOU.
As I learn this techn ology I will share my Sweet Peaolgy with you. A little of this and that, FREE tutorials on lots of things you can make. I'll even do tutortials on things you and I find on the web and can't seem to understand or make. I will give credit to the original tut, but will do it with lots of pics so we can understand how did they do that.
I will include little tuts and videos on sewing 101 so that you can get started and finish your project in a week if you only have a few minutes a day to get the job done with all your other busy day activities..kids, family, husbands, job, etc.
Over the next few weeks, as I begin publishing my new posts for you, keep a look out for giveaways related to sewing...yep, I am giving away some of my FABULOUS stash..so you can enjoy creating thru Sewing just as I have over all these years... see ya'll soon hugs rozzi
Subscribe to:
Comments (Atom)


